We’ve been harvesting and eating so many cucumbers, I haven’t bothered posting about it. Today I picked enough to make some spicy garlic dill slices for sandwiches. I used the recipe found here .
The only change I made was to add 1/8 teaspoon of pickle crisp to each of the 4 pints. I don’t like adding chemicals to our food but I also know that my family won’t eat pickles unless they are crisp!
They are off to a cool, dark place to finish bathing in seasoning. I’ll let you know how they turn out in a few weeks.
For those who know me, a recipe is merely a starting point. This dressing is no exception. Every year at this time, I’m drowning in fresh basil. So, every year at this time, I make enough pesto to feed an army and freeze it. The problem? We don’t eat all that much pesto so it was time to find another use for all of our basil.
This dressing is the answer! I did a search for “Basil Vinaigrette” recipes and came up with several recipes that sounded delicious. Then, I did what I always do, I improvised! This “recipe” is perfect for using whatever you happen to have growing in your yard on the day you need it. Most recipes call for 1/4 cup or more of olive oil. We try to limit our oil intake, so this only calls for 1 tablespoon of oil. But if you want more, slop in more! Consider this merely a guideline to your own salad dressing adventures!
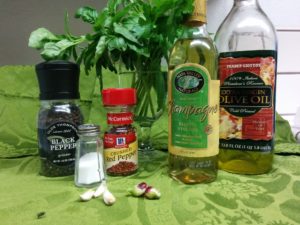
Ingredients: Fresh Basil – 1 to 2 cups Fresh Parsley – 10 leaves or to taste Vinegar (your choice) – 2 to 5 tablespoons Olive Oil (or not) – none to 1/2 cup Pepper – to taste Red Pepper Flakes – to taste Salt – to taste Fresh Garlic – at least one clove (live dangerously – add more!) Onion – Whatever you have! I’m using Egyptian Walking Onion Bulblets
Directions: Throw all ingredients into a blender. I use the smoothie cup from my Ninja. Blend, taste, add more seasonings if needed, blend again, dump on your salad. I’m guessing that because of the vinegar, this will last at least three days in your refrigerator. I usually just make enough for one meal at a time but then, we eat really BIG salads!
I plan on experimenting with a basil tarragon dressing to use on chicken salad. Stay tuned to find out how that variation goes!
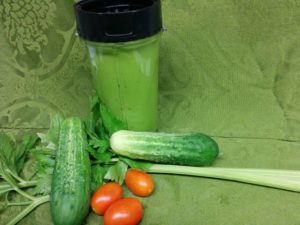
Tonight’s dressing along with some other vegetables picked from the garden for our nightly salad.
We recently moved our daughter and most of her furniture back home when she graduated from college. One of the things we didn’t move was her bed frame and mattress. They were old to begin with and after 4 years of living in an apartment complex built in the 1940’s that came with bedbugs, we decided we would not be moving it back to the house!
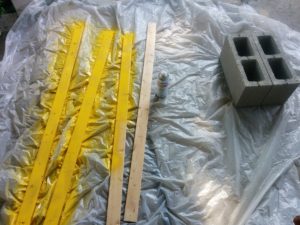
So, Hubby set to work dismantling them both into smaller sections so they would fit into the apartment dumpster. Don’t feel too badly for him, I suspect he has a secret fascination with seeing if there is something he can’t deconstruct with his Sawzall! In the middle of the bed frame deconstruction, I noticed a few items that I could easily repurpose: 4 wooden slats and a metal panel.
Where is that bed frame now?
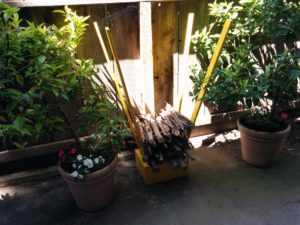
Wire panel from bed frame being repurposed as a trellis for pole beans. I had just been researching investing in cattle panels, but couldn’t justify spending more money than the product I was growing would have been worth. So glad I waited!The four bed slats, two cinder blocks, and a can of spray paint.The four bed slats repurposed into wood storage for our fire pit! Super easy project and it’s nice to have the wood neatly stored in plain sight.
It’s not hoarding if you use the things you’ve rescued! Never you mind about the rolls of rescued chicken wire I have stashed in the garden shed!
Garlic is my favorite herb, both medicinally and for flavor. There is nothing better than a warm baked clove of garlic spread on a piece of straight out of the oven homemade wedge of sourdough bread. And for someone with a history of chronic infection, high quality garlic oil capsules are a staple in my medicine cabinet.
But garlic is also one of those things that someone as disorganized as I am can grow with ease. It doesn’t need constant care. You plant it, toss some water on it during dry spells, and leave it alone to do it’s thing. It even acts as its own pest deterrent! In other words, it’s the perfect plant: it grows itself and everyone in my family will eat it!
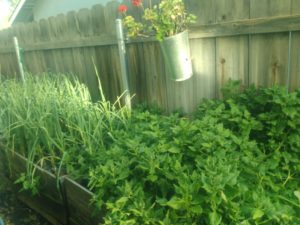
One of two garlic beds – this one is next to a bed of New Zealand Spinach. Both of these plants pretty much grow themselves and are pest resistant. Picture was taken in February 2018
Today was THE DAY – the day the garlic was ready for harvest. Actually, the garlic was ready a few days ago but life happens, so I guess I should say today was the day I was ready to harvest the garlic! This is my 7th year growing garlic successfully. My organic seed garlic came from Bountiful Gardens, a John Jeavons organization that no longer has a retail shop. I believe their source was Big John’s Garden in Oregon. But as you know, being the disorganized gardener that I am, I can’t be 100% sure. All I know, is that my first few years were a bit rough, but by carefully selecting and reseeding the largest heads, I now have garlic that has acclimated very well to Central California’s climate. I believe that this is my third year of being able to grow and store enough fresh garlic for seed and for use for an entire year. I did cut it pretty close, I think I have only 6 heads left from last years harvest!
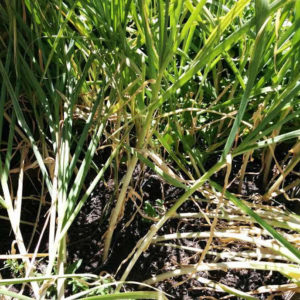
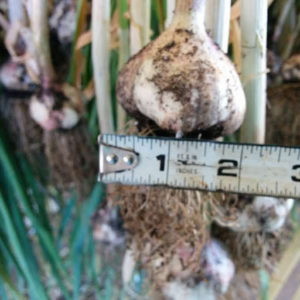
Garlic that is past ready to be harvested. The bulbs were planted mid-September 2017.
This year was an awesome harvest – most of my bulbs were around 2 inches across with some larger, some smaller. The size of the bulbs actually slowed down my harvest. Because of my cats, I plant into chicken wire so they are unable to dig up my garden beds. This year, the bulbs were so large I had trouble fitting them through the openings!
Most bulbs were about 2 inches across this year.
Since I grow in the soft soil of raised beds, I use my fingers to gently reach into the soil under each bulb and push up while pulling on the leaves. It’s important to not damage the leaves or the roots until the bulb has pulled all of the nutrients and energy from them during the curing process.
Curing process?!? That sounds complicated! Hopefully you know me well enough by now to know that I don’t do complicated. All it means is that we let the garlic, leaves, and roots dry. Many people braid the garlic, but since I’m only growing for my own use, I don’t bother with tarting my garlic up with braids. Besides, garlic is best stored in a cool, dark area. Putting it on display shortens it’s lifespan. Did I also mention it’s easier and faster to do it my way?
An old clothes drying rack makes a perfect place to cure your garlic.
I used to cure my garlic indoors but my family, while lovers of garlic, weren’t overly fond of the mess or the smell. Now, my garlic hangs out in a shady spot on our back patio. While garlic can take up to 2 months to completely dry, here in our triple digit, low-humidity summers, the drying process usually takes just a few weeks. As you can see, I’m using an old clothes drying rack to hang the garlic from. After it’s completely dry, I’ll trim the roots and leaves and take a few layers of the papery skin off to remove the dirt. Then, I’ll store the garlic in the black rack you see at the top of the picture. This is nothing more than a tray from the nursery that six-packs of impatiens came in. I’ll place the rack on top of some wooden blocks on a shelf in my pantry so that air can circulate freely around the bulbs. That’s it, done. And all I had to do was water a few times!
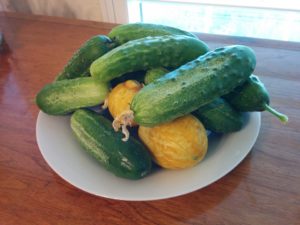
Go and look again! For every cucumber I pick at the perfect size, there seem to be three more that I completely miss until they are the size of a kayak! We’ve had a streak of hot weather and my cucumbers have been thriving in the heat. I currently have 4 producing cucumber plants. Because I mostly grow in containers, I grow a combination of pickling cucumbers and lemon cucumbers. They are smaller and will climb a trellis quite happily. But, because I am cramped for space, I have vines weaving in and out of everything and it’s easy to miss a rogue cucumber.
June 2, 2018 Cucumber Harvest!
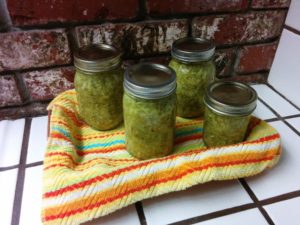
One of my goals this year was to grow enough cucumbers for relish and pickles. So, I was thrilled to come in from the garden with a bowlful of cukes. Because they were several different sizes, I decided to make relish. Alas, I was 5 ounces short! What to do? The answer was easy enough, head back out to the garden and be a bit more thorough with my cucumber hunt. Lo and behold, hanging down the back of the planter against the house, was another cucumber! I was absolutely shocked, not! LOL
The relish was saved! Although in a pinch, you can substitute a zucchini or two if you are short on cucumbers. But, where would I ever find a zucchini?!?
Do you recall me bragging about being able to eat my first tomato of the year? Well, someone beat me to it. Or, I suppose I should say “something.” I suspect a member of the slimy hoard family (slug or snail). I was having some stomach issues so put off picking the wonderful tomato until I could handle the acid. I waited too long! But, all is well. I reapplied the Sluggo and have since consumed the tomatoes that ripened shortly after my “first that wasn’t my first.”